Published
- 4 min read
Creating a VoIP Environment

Creating a VoIP Environment: Building Connections and Analyzing Data with Wireshark
Hey folks, it’s Ahmed Mahmoud, or you might know me as xElessaway. Today, I want to share my journey of setting up a VoIP Environment and capturing its essence with Wireshark. All it takes is a virtual machines (VMs) to kickstart your VoIP server. I personally went with Asterisk for the server side and MicroSIP for Clients calls. And if you’re more inclined towards using your Android device, you can even try out ‘MizuDroid.’ Excited to get started? Let’s jump into the essentials for getting your server up and running.
Tools You’ll Need
But before we dive into the setup, let’s understand the fundamentals of VoIP Protocol.
VoIP Protocol
VoIP, or Voice over Internet Protocol, is a technology that allows you to make voice calls using a broadband internet connection instead of a regular (or analog) phone line. It converts the audio signal, which is analog, into digital data that can be transmitted over the internet.

VoIP RTP Packets Movement
So, let’s head to our ubuntu server on the VM and download Asterisk
wget https://downloads.asterisk.org/pub/telephony/asterisk/asterisk-20-current.tar.gz | tar -zxvf asterisk-20-current.tar.gz
now you need to install some necessary libraries let’s run the command.
sudo apt-get install build-essential libssl-dev libncurses5-dev libnewt-dev libxml2-dev libsqlite3-dev uuid-dev libedit-dev libjansson-dev
Asterisk Files
Alright, let’s kick off the Asterisk installation with ‘make,’ but before diving into it, let’s ensure that SIP (Session Initiation Protocol), the backbone of VoIP for voice and audio communication, is enabled. After all, VoIP is all about voice and audio, right? Let’s make sure it’s activated and ready to go :D!
sudo make menuselect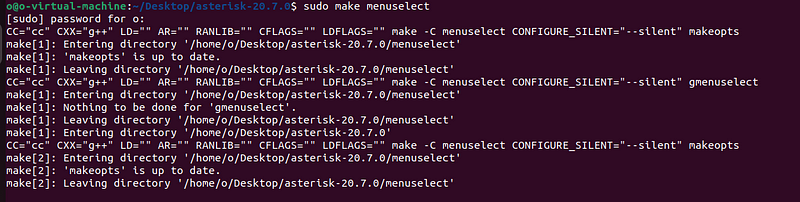
1st Phase of menuselect
When configuring the Channel Drivers, make sure to enable ‘chan_sip.’ This step ensures that SIP, the cornerstone of VoIP communication, is properly configured and ready to facilitate seamless connections.
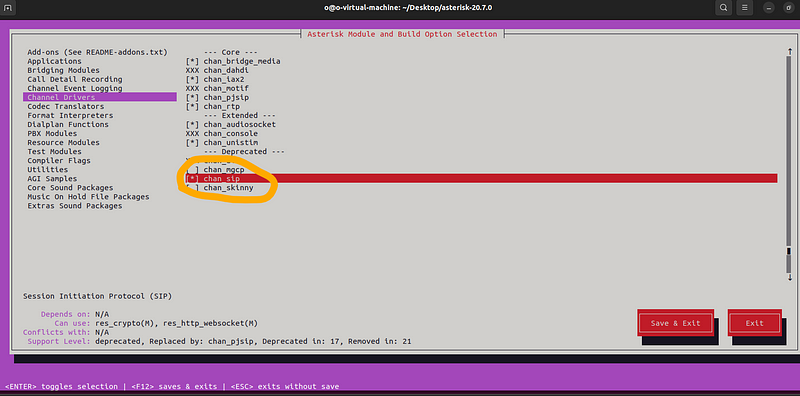
Enable SIP Chain
After enabling ‘chan_sip’ and saving the changes, let’s proceed by running the configure file and initiating the installation process. This step will configure Asterisk according to our settings and install it onto our system.
       #!bin/bash
./configure
sudo make
sudo make install
sudo make samples
And we wait and wait and wait.

And finally, we’ve completed the setup process. Now, let’s move on to configuring usernames and passwords. We’ll focus on three files located in “/etc/asterisk” directory and update them accordingly.
sip.conf
       [general]
context=internal
allowguest=no
allowoverlap=no
bindport=5060
bindaddr=0.0.0.0
srvlookup=no
disallow=all
allow=ulaw
alwaysauthreject=yes
canreinvite=no
nat=yes
session-timers=refuse
localnet=192.168.0.0/255.255.255.0

[1234]#Client 1
type=friend
host=dynamic
secret=1234
context=internal

[4321]#Client 2
type=friend
host=dynamic
secret=4321
context=internal
extensions.conf
       [internal]
exten => 1234,1,Answer()
exten => 1234,2,Dial(SIP/1234,60)
exten => 1234,3,Playback(vm-nobodyavail)
exten => 1234,4,VoiceMail(1234@main)
exten => 1234,5,Hangup()

exten => 4321,1,Answer()
exten => 4321,2,Dial(SIP/4321,60)
exten => 4321,3,Playback(vm-nobodyavail)
exten => 4321,4,VoiceMail(4321@main)
exten => 4321,5,Hangup()

exten => 8001,1,VoicemailMain(1234@main)
exten => 8001,2,Hangup()

exten => 8002,1,VoicemailMain(4321@main)
exten => 8002,2,Hangup()
voicemail.conf
       [main]
1234 => 1234

4321 => 4321
Now that we’ve set up the two clients ready to call each other, let’s ensure Asterisk loads the ‘chan_sip’ module. We can do this by opening the ‘module.conf’ file and updating a specific line.

autoload in module.conf
Make sure autoload is yes then go to line noload = chan_sip.so

load the chain_sip.so
and make it
;loadload = chan_sip.so
Now we are done. let’s try to run the Asterisk server.
sudo asterisk -r
asterisk.ctl exist issue
If you got faced this issue you can split the terminal and run
sudo asterisk -cthen run the second command again.

Server is up
Nice the server is up now. the hard part is over. now let’s setup the MicroSIP.
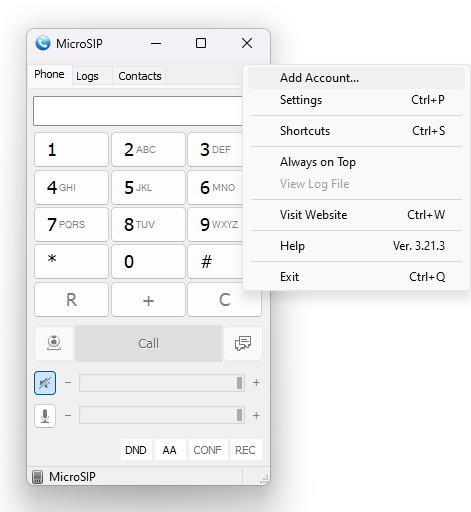
Add account to MicoSIP
We will Add Account.
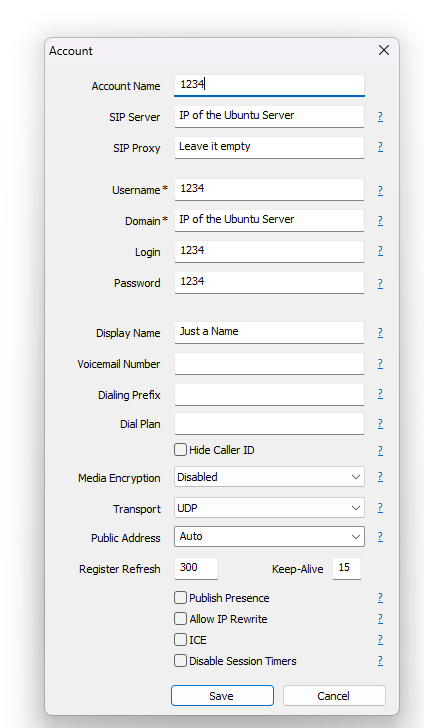
Account Setup in MicroSIP

Make sure it’s working well
Once added, the account will be online, and running the command ‘sip show peers’ will confirm the connection. Now, let’s proceed by adding the other account on the second machine, or alternatively, you can use an Android device like “MizuDroid.” Afterward, let’s open Wireshark to capture the traffic and dive into the world of VoIP communication ;)
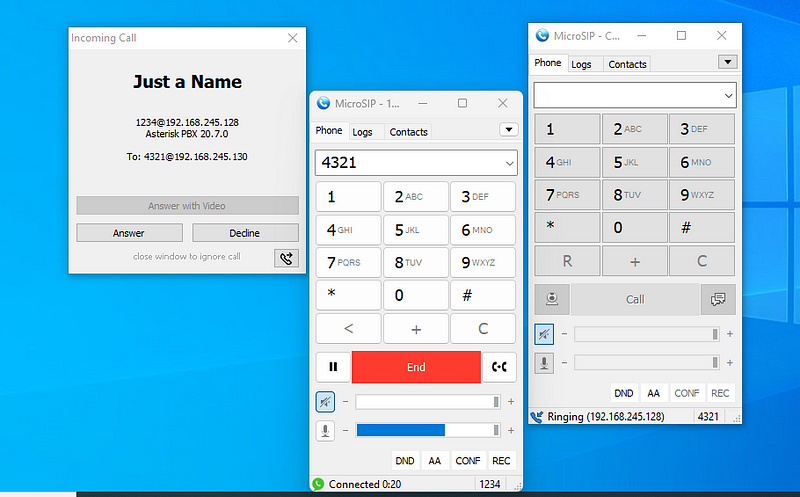
Sending Call Test
And just like that, as you can see, we’ve successfully captured the traffic on Wireshark! 🎉 It’s a clear indication that our VoIP setup is running smoothly and communication is flowing seamlessly.
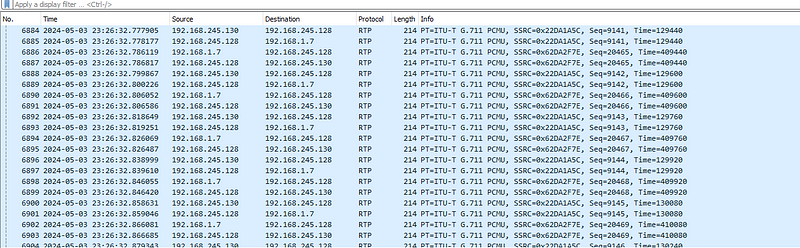
RTP Streams on Wireshark
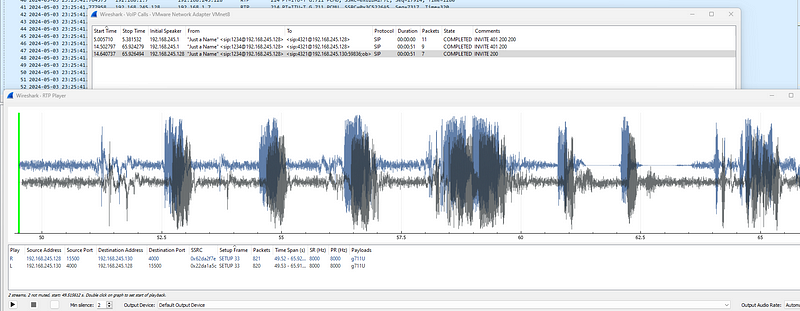
RTP Play Stream Test
We can play the RTP streams too and listen to the call :V
In conclusion, building and analyzing our VoIP environment has been a rewarding journey. Thank you for reading and hope you enjoyed and learn something new ^^ ❤
By Ahmed Elessaway on May 3, 2024.